iPhone travel guide

eSIM for iPhone: Compatibility, Setup, Travel Settings, and Transfer

Most iPhone XS, XS Max, XR, and later models can use eSIM, but the exact model and country of purchase still matter. Before buying a travel plan, confirm the iPhone supports eSIM, shows No SIM Restrictions, and is accepted by the carrier or travel provider. Then choose the setup path the provider actually supports and separate installation from the moment the plan starts.

First checkExact model and purchase region
Carrier lockNo SIM Restrictions
Travel ruleOne cellular data line at a time

The short answer

Pass three gates before choosing a plan

An iPhone model name alone is not enough. Apple changes the available SIM formats by model and sales region, so start with the model number and the country or region where the device was purchased. Next, check Settings > General > About > Carrier Lock. If you want to use a travel eSIM from a different company, Apple says the status should read No SIM Restrictions.

The third gate is the service itself. The carrier or travel eSIM provider must support the phone, destination, and setup method. A compatible iPhone cannot make an unsupported plan work, and an unlocked phone does not prove that every provider will issue or transfer an eSIM to it.
1

Identify the exact iPhone

Check the model and where it was sold.

Use Apple's current SIM-type table because regional versions of the same iPhone family can differ.

2

Check the carrier lock

Look for No SIM Restrictions.

A locked iPhone may accept only the current carrier's plans, even when the hardware supports eSIM.

3

Verify the exact service

Confirm destination, device, and setup path.

Use the provider's current instructions for activation timing, roaming, transfer, support, and refunds.

Compatibility without guesswork

“iPhone XS or later” is the starting rule, not the final answer

Apple's baseline is iPhone XS, iPhone XS Max, iPhone XR, or later. The important exception is that eSIM availability can still vary by the model's country or region of purchase. Instead of relying on a reseller's generic list, compare the exact device with Apple's current model and SIM-type table .

Also confirm that the destination network or travel provider supports eSIM service for that device. Hardware support, an unlocked status, and provider support are three separate facts. This page focuses on making that travel decision; use the site's eSIM compatibility checker for the broader pre-purchase checklist.

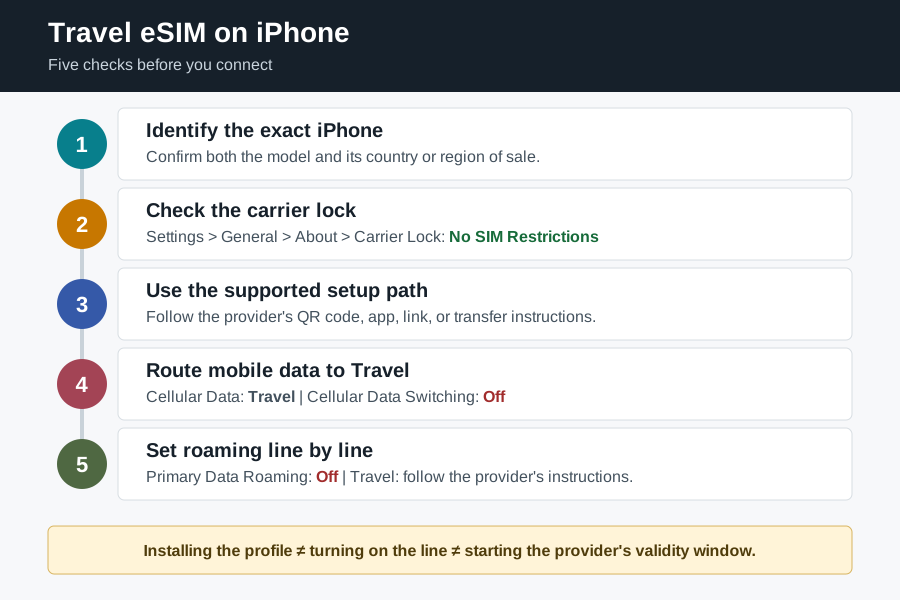
Decision flow for using a travel eSIM on iPhone: check the exact model and sales region, confirm No SIM Restrictions, add the eSIM through a supported method, select it for cellular data, and keep data roaming off on the primary line.
Use the checks in order. Passing a later setup screen does not replace an earlier model, lock, or provider check.

Five setup paths

Use the method your carrier or travel provider gives you

The Add eSIM screen can offer several routes. They are not interchangeable: availability depends on the carrier, country, plan, iOS version, and whether another phone already holds the line.

Apple-supported eSIM setup paths
PathUse it whenWhat happensVerify first
eSIM Quick TransferMoving an eligible carrier line from a nearby iPhoneThe new iPhone requests the line from the previous iPhone without requiring the carrier to send a new QR code.The carrier must support Quick Transfer. Apple currently requires the devices to use the same Apple Account, be nearby with Bluetooth on, have the previous iPhone unlocked with its passcode, and run iOS 18.4 or later.
Carrier ActivationThe carrier assigns an eSIM to the iPhoneA notification or setup prompt appears and the assigned plan can be added.Confirm the carrier has the correct device identifiers and that the plan is ready for activation.
QR codeThe provider issues a QR code for this planOpen Add eSIM and scan the code. With iOS 17.4 or later, Apple also supports pressing and holding a code shown in the default email app or browser, then choosing Add eSIM.Read whether the code is single-use, when validity begins, and what support process applies if setup fails.
Link, app, or manual detailsThe provider supplies a setup link, an app workflow, or activation fieldsThe provider starts setup directly or gives the SM-DP+ address, activation code, and any confirmation code needed for manual entry.Use only the provider's official instructions and confirm the exact plan attached to the activation details.
Transfer from a non-Apple phoneThe number currently sits on an Android or another deviceA supported carrier may offer a direct transfer; otherwise the carrier must move or reissue the service through its own process.Do not assume an iPhone-to-iPhone workflow applies. Check the carrier's current cross-platform transfer instructions.

Menu names can appear as Cellular, Mobile Data, Mobile Service, or Add eSIM depending on region and iOS version. Follow the wording on the current device and the provider's official instructions.

Before departure

Prepare the iPhone without starting the wrong clock

Buying a plan, installing its profile, enabling the line, and starting paid validity are related events, but they are not automatically the same event.

1

Record the device facts

Save the exact iPhone model, carrier-lock status, IMEI, and EID. These are useful if the carrier must troubleshoot or assign the plan.

2

Read the activation trigger

Find out whether validity begins at purchase, installation, line activation, or the first connection to a supported network.

3

Install on stable Wi-Fi

Do this before departure only when the provider allows early installation. Keep the provider's instructions and support route available offline.

4

Give each line a clear label

Use labels such as Primary and Travel so the data, voice, roaming, and messaging choices are easy to audit.

5

Choose the travel line for data

At the correct time, select the travel eSIM under Cellular Data and turn off Cellular Data Switching unless you knowingly want the primary line to take over.

6

Apply the provider's roaming rule

Many travel eSIMs use roaming partners. Enable Data Roaming on the travel line only when its instructions require it, and keep it off on the primary line unless intended.

The timing distinction

Installation, line status, and plan validity are three separate checks

Installation places the eSIM profile on the iPhone. Turning On This Line allows the iPhone to use that profile. Plan validity is the provider's paid service window. The provider decides what starts that window, so the iPhone showing the eSIM does not prove that the allowance has started—or that it has not.

Before installing, capture the exact plan name, included countries, data allowance, validity period, activation trigger, and support method. If the wording is unclear, ask the provider before relying on the plan. The more detailed eSIM installation guide covers the general phone workflow; this article keeps the focus on iPhone travel decisions.

Dual SIM travel settings

Keep the primary number without giving it accidental data use

A travel eSIM can handle cellular data while the primary line remains available for calls or messages, but each setting solves a different problem.

Settings to review before and after arrival
SettingTypical travel choiceWhy it matters
Turn On This LinePrimary: on only when needed and understood
Travel: on at the provider's stated time
A line must be enabled to receive or place carrier calls and messages. Keeping the primary line enabled can still expose it to roaming charges.
Cellular DataSelect the travel eSIMThe iPhone uses only one cellular data network at a time. This choice determines which line supplies mobile data.
Cellular Data SwitchingUsually off for cost controlWhen enabled, the iPhone may use cellular data from the other line under some conditions. Leave it off unless that behavior and its cost are intentional.
Data RoamingPrimary: off unless deliberately roaming
Travel: follow the provider's instructions
A travel eSIM may need roaming enabled to use partner networks, while the home line can generate roaming charges if its data roaming remains on.
Default Voice LineChoose by the calls you intend to makeA data-only travel eSIM may not provide ordinary carrier calls or SMS. The primary line's voice and message fees still come from its carrier.
Network SelectionAutomatic unless the provider names a manual choiceIf a travel plan fails to connect, use only a provider-supported network rather than testing arbitrary networks as if all were included.

Calls, texts, iMessage, and FaceTime

Keeping a number visible is not the same as avoiding charges

On a compatible Dual SIM iPhone, you can usually leave the primary line enabled and use the travel eSIM for cellular data. That can preserve access to the usual number for carrier calls, SMS, and identity checks, subject to the home carrier's coverage and roaming terms.

iMessage and FaceTime can use the travel line's data connection, but check the identities listed under Send & Receive and the default line used for new conversations. A data-only travel eSIM does not automatically include a new carrier phone number, voice minutes, or SMS. Before depending on a one-time code abroad, confirm how the primary carrier handles incoming messages and roaming.

  • Label the home line Primary and the new plan Travel before changing any defaults.
  • Select Travel for Cellular Data and verify that Cellular Data Switching is off.
  • Leave Primary enabled only after checking its call, SMS, voicemail, and roaming charges.
  • Check the phone numbers and email addresses selected for iMessage and FaceTime.
  • Make a backup sign-in plan for services that depend on SMS verification.

Capacity

An iPhone can store several eSIMs, but it does not use all of them at once

Apple says an iPhone can store eight or more eSIMs. Compatible iPhones can use two phone numbers at the same time, and iPhone 13 models and later support two active eSIMs. The exact combination depends on the model: an earlier compatible iPhone may use a physical SIM and one eSIM, while a later model can support two active eSIMs.

Only one cellular data network is used at a time. Storing several travel profiles is therefore useful for repeat trips or multi-country planning, but the traveler still has to select the correct line for data and keep the other lines' roaming behavior under control.

Moving to a new iPhone

A phone backup does not guarantee that the cellular line has transferred

Apple offers eSIM Quick Transfer for supported carriers. Under Apple's current requirements, both iPhones should use the same Apple Account, the previous iPhone should be unlocked with its passcode, the devices should be nearby with Bluetooth on, and both should use iOS 18.4 or later. The carrier must also support the feature.

When the new iPhone activates the phone number, that line is deactivated on the previous iPhone. Treat this as a service move, not merely a copy of the old phone's data. Confirm calls, messages, and cellular data on the new device before erasing or trading in the old device.

A prepaid travel eSIM can use a different rule. Some providers allow a transfer, while others require support or a reissued profile. Follow the exact provider process rather than assuming that a QR code can be scanned again.

When setup fails

Troubleshoot the smallest failing layer first

Do not repeatedly change every setting. Identify whether the failure is compatibility, profile installation, line activation, data selection, or destination-network access.

Symptom-based iPhone eSIM checks
SymptomCheck firstNext action
Add eSIM is missing or unavailableExact model, sales region, iOS version, and carrier restrictionsUse Apple's current model table and ask the carrier whether the device and account are eligible.
The profile is installed but the line will not activateProvider activation status and the selected lineToggle Airplane Mode, turn the line off and on, restart the iPhone, and check for a carrier settings update.
The line is active but mobile data does not work abroadCellular Data selection, provider-required roaming, included country, and plan validityConfirm the travel line is selected for data and follow the provider's supported network and roaming instructions.
Quick Transfer does not appear or completeCarrier support, Apple Account, proximity, Bluetooth, lock state, and current iOSUse the carrier's alternative activation or reissue process if the transfer path is not supported.
The iPhone shows SOS, No Service, or SearchingCarrier status, destination coverage, line status, and network selectionFollow Apple's eSIM troubleshooting flow and contact the carrier if service remains unavailable.

Have the identifiers ready before contacting support

Apple's troubleshooting guidance recommends contacting the carrier when basic checks do not resolve activation. Keep the phone number, carrier account details, IMEI, and EID available. These appear under Settings > General > About.

Apple also offers diagnostics through Apple Support. Use that route when the carrier believes the plan is ready but the iPhone still cannot add or activate it.

Evidence boundary

What this guide can and cannot confirm

This page uses Apple's published support material for device support, setup paths, Dual SIM behavior, transfer requirements, travel checks, and troubleshooting. It does not promise that a particular carrier or travel provider will accept an iPhone, transfer a plan, deliver a verification message, or provide continuous coverage at a destination.

Carrier eligibility, Apple menu wording, software requirements, plan validity, supported countries, roaming settings, prices, and refund rules can change. Confirm the current device and plan with Apple and the provider before purchase. Best eSIM Tools has not field-tested every iPhone, carrier, destination, or travel eSIM described by these decision rules.

Official references

Apple sources checked for this guide

These links were reviewed on September 25, 2026. They are the primary source for the Apple-specific facts on this page; the carrier or travel provider remains the source for its own plan and account rules.

FAQ

iPhone eSIM questions

Which iPhones support eSIM?

Apple says iPhone XS, iPhone XS Max, iPhone XR, and later models support eSIM, but support still depends on the exact model, the country or region where it was purchased, and the carrier. Check Apple's current model table before buying a plan.

Can I keep my regular SIM active while using a travel eSIM?

Often yes. On a compatible Dual SIM iPhone, keep the primary line on for calls or messages and select the travel eSIM for Cellular Data. Turn off Cellular Data Switching and confirm the primary carrier's roaming charges, because leaving a line enabled can still create charges.

Should I install my travel eSIM before I leave?

Install it on stable Wi-Fi before departure only when the provider permits early installation. Installation, turning on the line, and starting the plan's validity are separate events, so read the exact activation rule first.

Can I transfer an eSIM to a new iPhone?

Sometimes. Apple's eSIM Quick Transfer works only when the carrier supports it and the devices meet Apple's current requirements. When the new iPhone activates the number, the line on the previous iPhone is deactivated. A travel eSIM provider may require a different transfer or reissue process.

How many eSIMs can an iPhone store and use?

Apple says an iPhone can store eight or more eSIMs. Compatible models can use two phone numbers at the same time, and iPhone 13 models and later support two active eSIMs. Only one cellular data network is used at a time.

What should I do if an eSIM will not activate on my iPhone?

Start by toggling Airplane Mode, turning the line off and on, restarting the iPhone, and checking for a carrier settings update. If it still fails, use Apple Support diagnostics or contact the carrier with your phone number, account details, IMEI, and EID.